
Quisim User Interface Guide
Overview
This guide shows you around the Quisim window: where things are, how to build and run a model, and how to read the results. It is written for students who are new to Quisim. Most of the interface explains itself once you know where to look, so the sections are short and focus on tasks.
The concepts behind the screen (blocks, entities, pipes and wires, replications) are explained in the handbook. Every block, attribute and socket is listed in the API reference. This guide does not repeat them.
In the text, shortcuts are written for Windows and Linux, for example Ctrl+S. On macOS use ⌘ instead of Ctrl (⌘S). The tables show both, and the shortcut table lists every shortcut for both systems, including the few that differ.
Starting Quisim
When Quisim starts, two small green dots spin while the interface loads. The release version loads its interface from quisim.com, so it needs an internet connection. If loading fails, an error message replaces the dots, for example "resource loading error, please check the internet connection."
Signing in (desktop app). If the app asks you to sign in, a Sign in to Quisim dialog appears:
- Click Sign in. Your web browser opens the Quisim login page.
- Sign in there. The dialog shows "Waiting for the browser to finish signing in…" and closes by itself when sign-in has worked.
- If the browser does not return to Quisim, click Having trouble? (the same field also appears by itself after about 12 seconds). Copy the address your browser ended up at, paste it into the field and click Submit or press Enter.
- If something went wrong, the dialog shows the error in red. Click Try again.
In the browser version you sign in on the web page before Quisim loads, so this dialog never appears.
The Quisim window
The window has a canvas side on the left and an editor side on the right. On the first start only the canvas is shown: click Display editor (pen icon at the right end of the main toolbar, Ctrl+E) to open the editor pane. From left to right and top to bottom you find (the numbers match the picture below):
- Main toolbar. It runs across the top of the canvas side and holds the run controls, the progress display, zoom and the editor toggle.
- Canvas. The large area below the toolbar shows your model as connected blocks. While it runs, entities move through it.
- Splitter handle. Drag it to share the width between canvas and editor pane.
- Editor toolbar, at the top of the editor pane. The editor pane is about 320 px wide at first.
- Code editor.
- Error list, between code editor and lower tabs. It appears only when there are errors or warnings, so the picture does not show it.
- Lower tabs: Examples, Blocks, Properties, Monitor and Explainer.
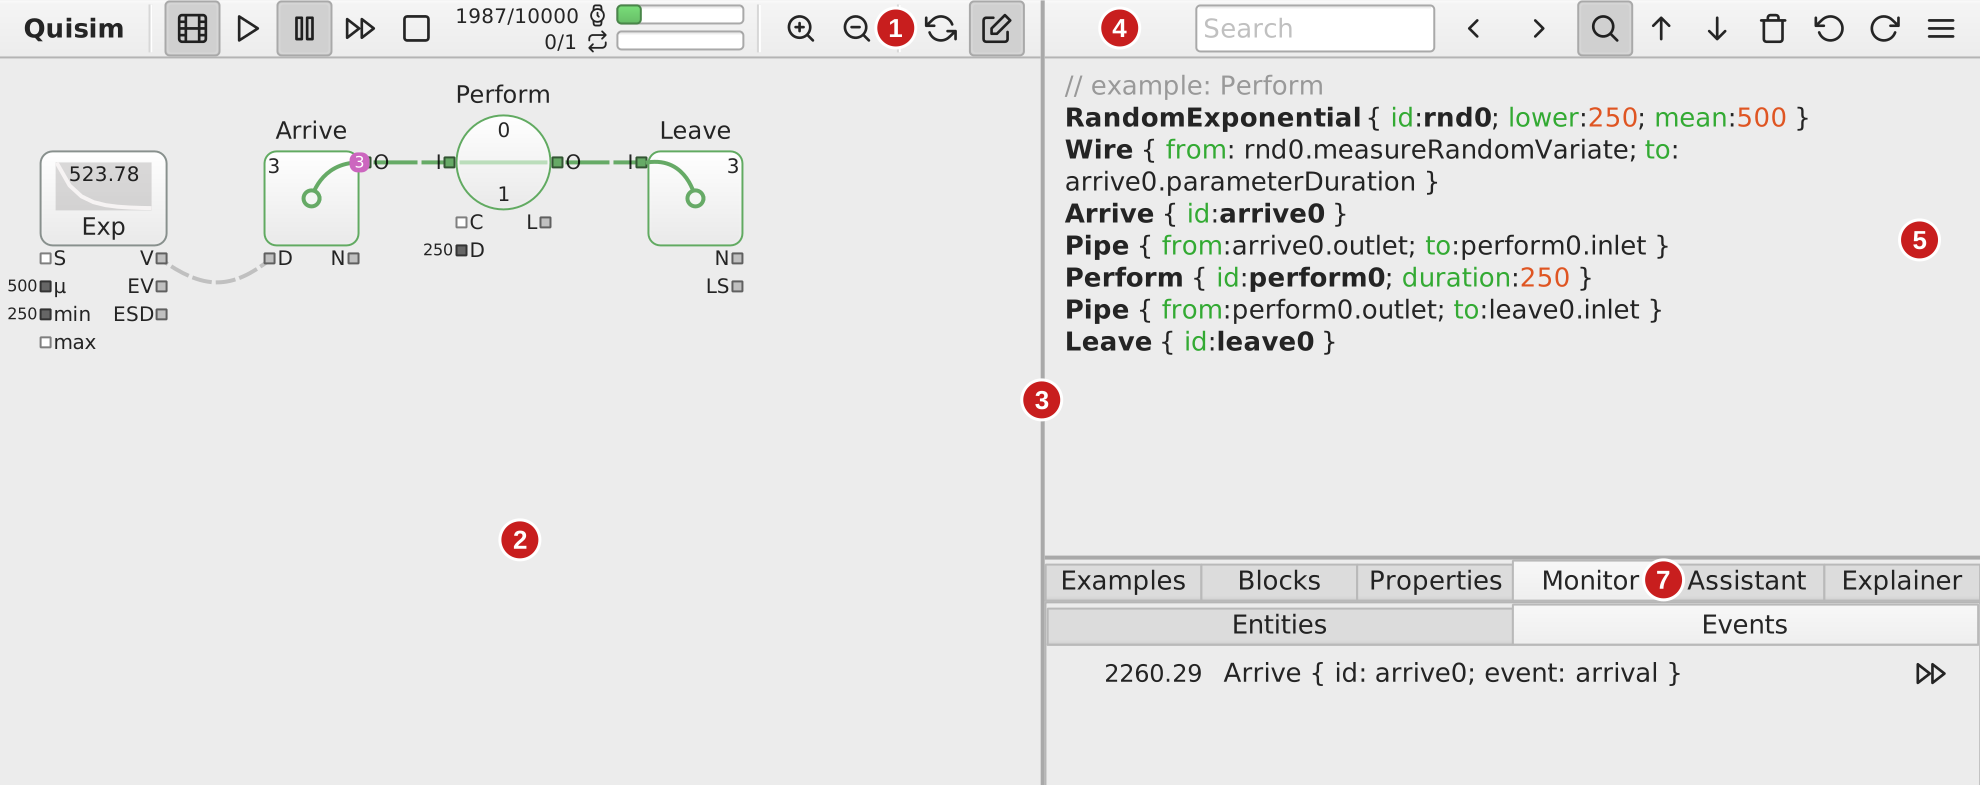
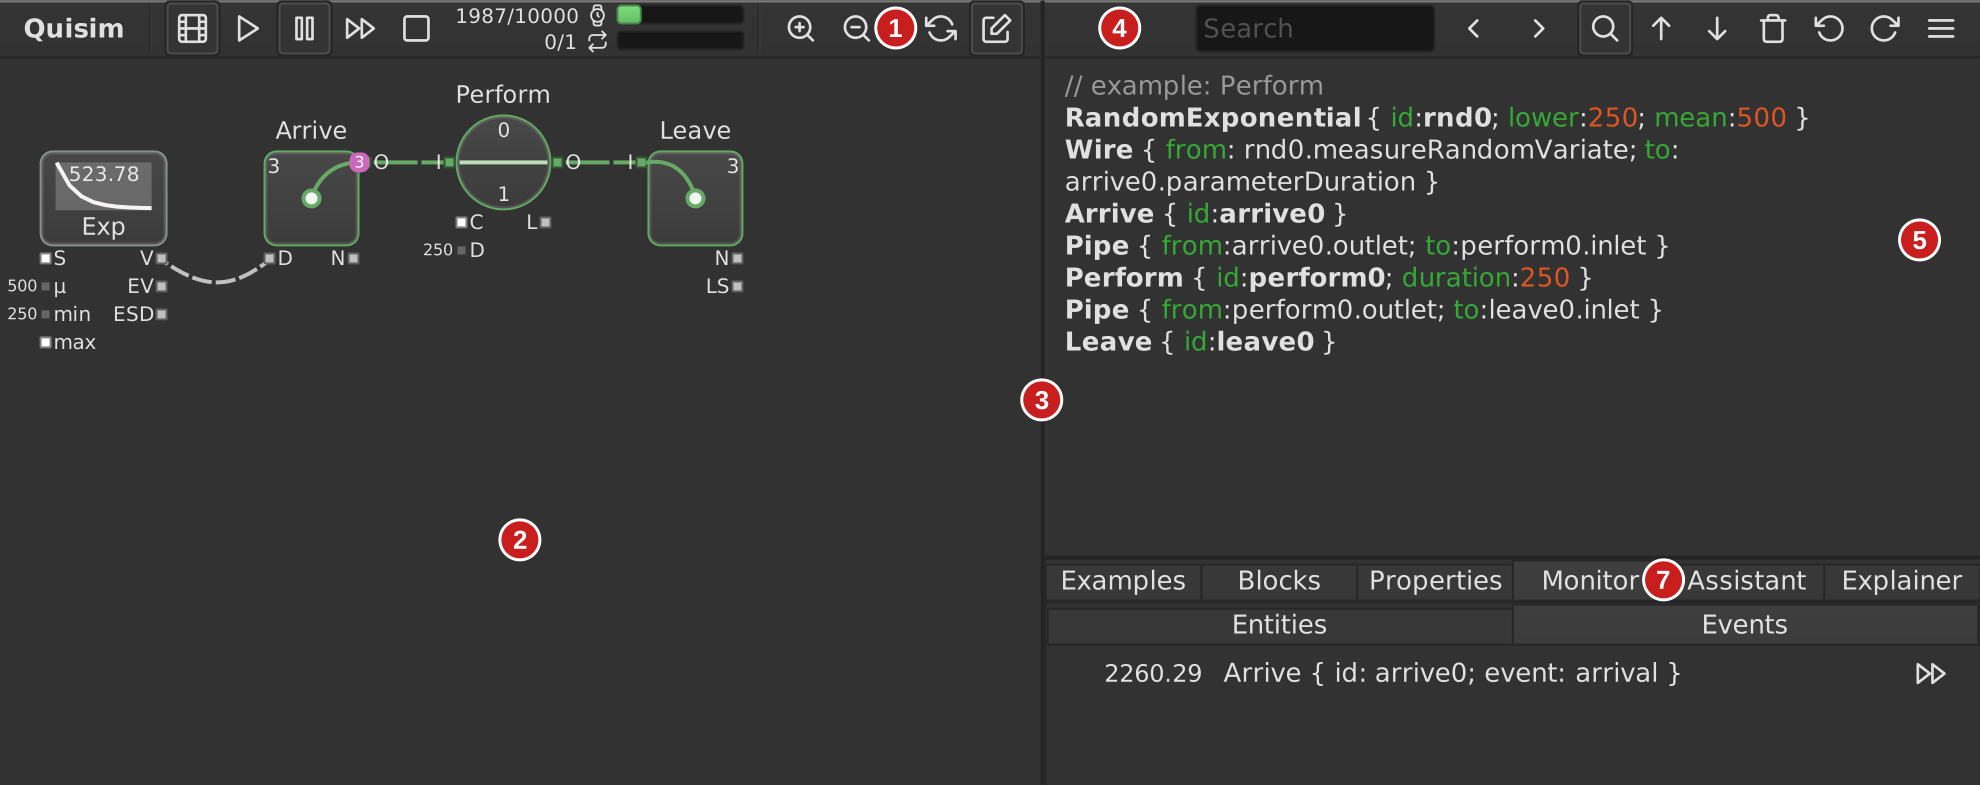
All the dividers in the editor pane can be dragged too. A pane can shrink to its toolbar or tab bar. To hide the whole editor pane and give the canvas the full width, use Display editor (pen icon in the toolbar, Ctrl+E). Note that while the editor pane is hidden the canvas is locked: you cannot move or connect blocks, and hovering a socket shows nothing.
Quisim has no settings dialog. It remembers your layout instead: window size and position, splitter positions, whether the editor pane and search bar are shown, the selected tabs, the Animate setting and the last folder you used for files.
The main toolbar
From left to right:
| Button | What it does |
|---|---|
| Quisim (bold text) | Opens the About dialog. |
| New, Open, Download as… | Browser version only, see Files below. |
| Animate (film) | Turns animation on or off. |
| Start clean (play) | Starts a new run from time 0. |
| Pause (pause) | Pauses or resumes the run. It looks pressed while paused. |
| Step (fast-forward) | Runs exactly one event. |
| Stop (square) | Resets the run. |
| Progress display | Time and replication progress, see Running a simulation. |
| Zoom in / Zoom out (magnifiers) | Zoom the canvas. |
| Reload (circular arrows) | Applies code changes to the canvas. |
| Display editor (pen) | Shows or hides the editor pane. |
Hover any button to see its name. Greyed-out buttons do not apply right now. For example, Stop is only active while a run is in progress. When the window is narrow the toolbar wraps onto a second line.


Getting started
Open an example and run it
The fastest way to see Quisim working is one of the built-in examples.
- If the editor pane on the right is not shown (as on the first start), click Display editor (pen icon in the main toolbar).
- Click the Examples tab in the lower part of the editor pane.
- Click M/M/1. The model appears in the code editor and on the canvas.
- Make sure Animate (film icon) is on.
- Click Start clean (play icon) or press Ctrl+Enter. Entities, shown as small numbered bubbles, start to move through the blocks.
- Click Pause (Ctrl+P) to stop and look around, and click it again to continue.
The examples go from simple (Arrive→Leave, Perform, M/M/1) to more advanced (Pack→Unpack, Two-Step, Sensitivity). Loading an example replaces the current model. In the full version you can bring the previous model back with Undo (Ctrl+Z). To keep a changed example, save it with Save as….
A model never starts by itself after loading. Press Start clean or Step.
Building a model on the canvas
A model is a network of blocks connected by pipes (entities, green) and wires (values, silver). See Block Sockets in the handbook for what they mean. This section shows how to draw them.
Adding blocks from the Blocks tab
The Blocks tab shows live previews of all blocks, sorted into the sub-tabs Value, Random, Entity and Report. Hover a block for a moment to see a short description.
- Click a block to add it to the model. Quisim gives it a unique id (for example
queue0) and places it automatically. - Drag a block onto the canvas to put it at exactly that spot.
- Drag a connection from a socket on the canvas onto a socket of a block preview to add that block already connected. See Adding a connected block.
Sockets
The small squares around a block are its sockets. Entity inputs sit on the left and entity outputs on the right (green). Value inputs (parameters) sit at the bottom left and value outputs (measures) at the bottom right (when the handbook and the API reference say "left" and "right" for value sockets, they mean these two groups below the block). A parameter socket is white when free, silver when a wire is connected, and dark grey when its value is fixed in the code. The small round socket at the bottom is the block's active input.
Hover a socket to see its current value and a short description. A red socket during animation means an entity is blocked there.
Some outlets appear only when they are in use: a Queue shows R (renege) only if a renege duration is set or wired, and E (evict) only if evictExcess or preemptive is set; a Perform shows E only if haltExcess or preemptive is set. An outlet that already has a pipe always stays visible. The visible outlets move up to close the gap, so E can be the second outlet.
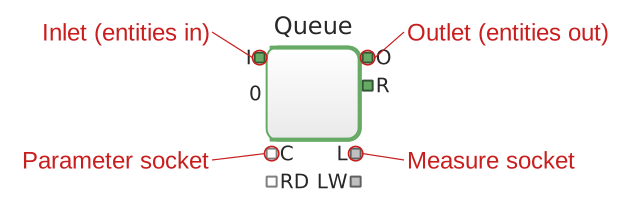
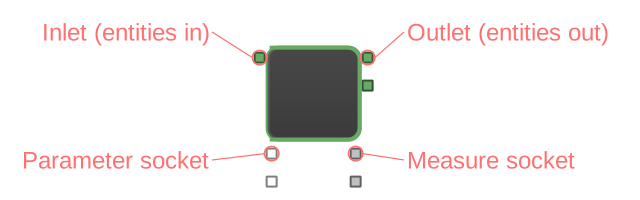
Connecting blocks
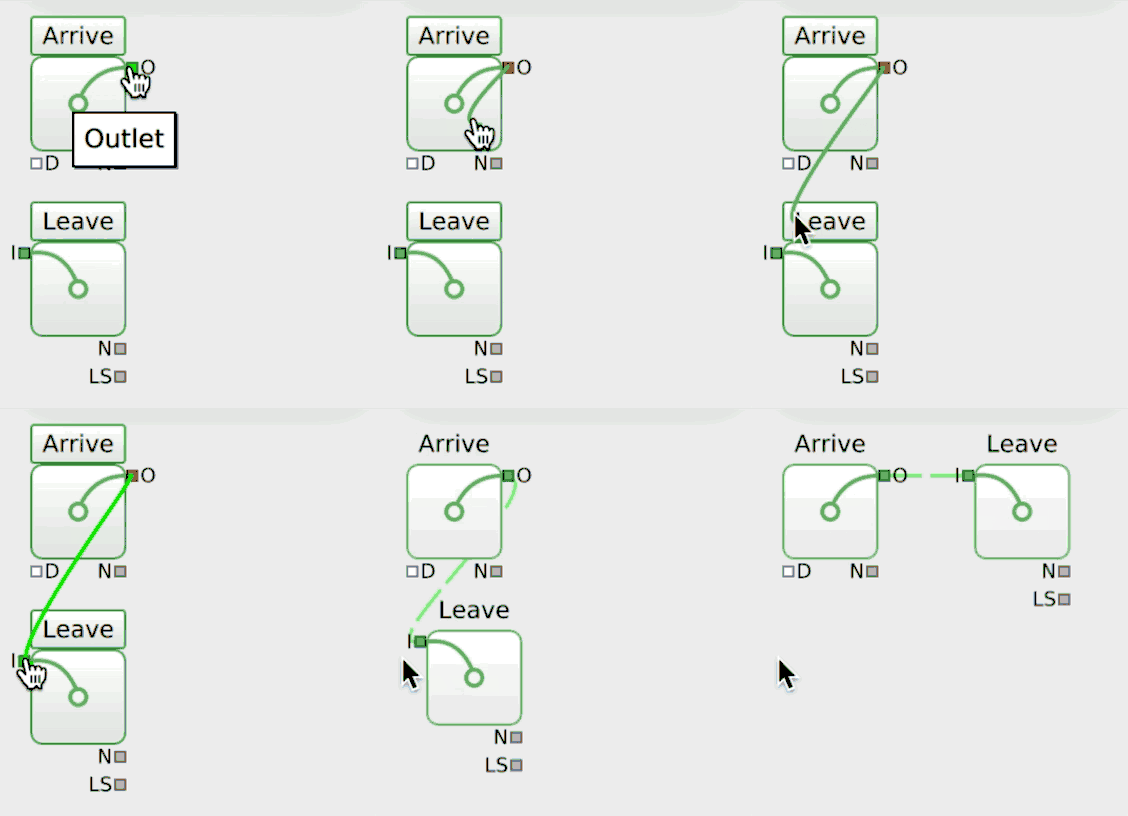
- Press on a socket and drag. A line follows the mouse.
- Move onto a matching socket of another block. It lights up bright green.
- Release. Quisim adds a Pipe (outlet to inlet) or a Wire (measure to parameter), writes it into the code and reloads the model.
You can start from either end.
Adding a connected block
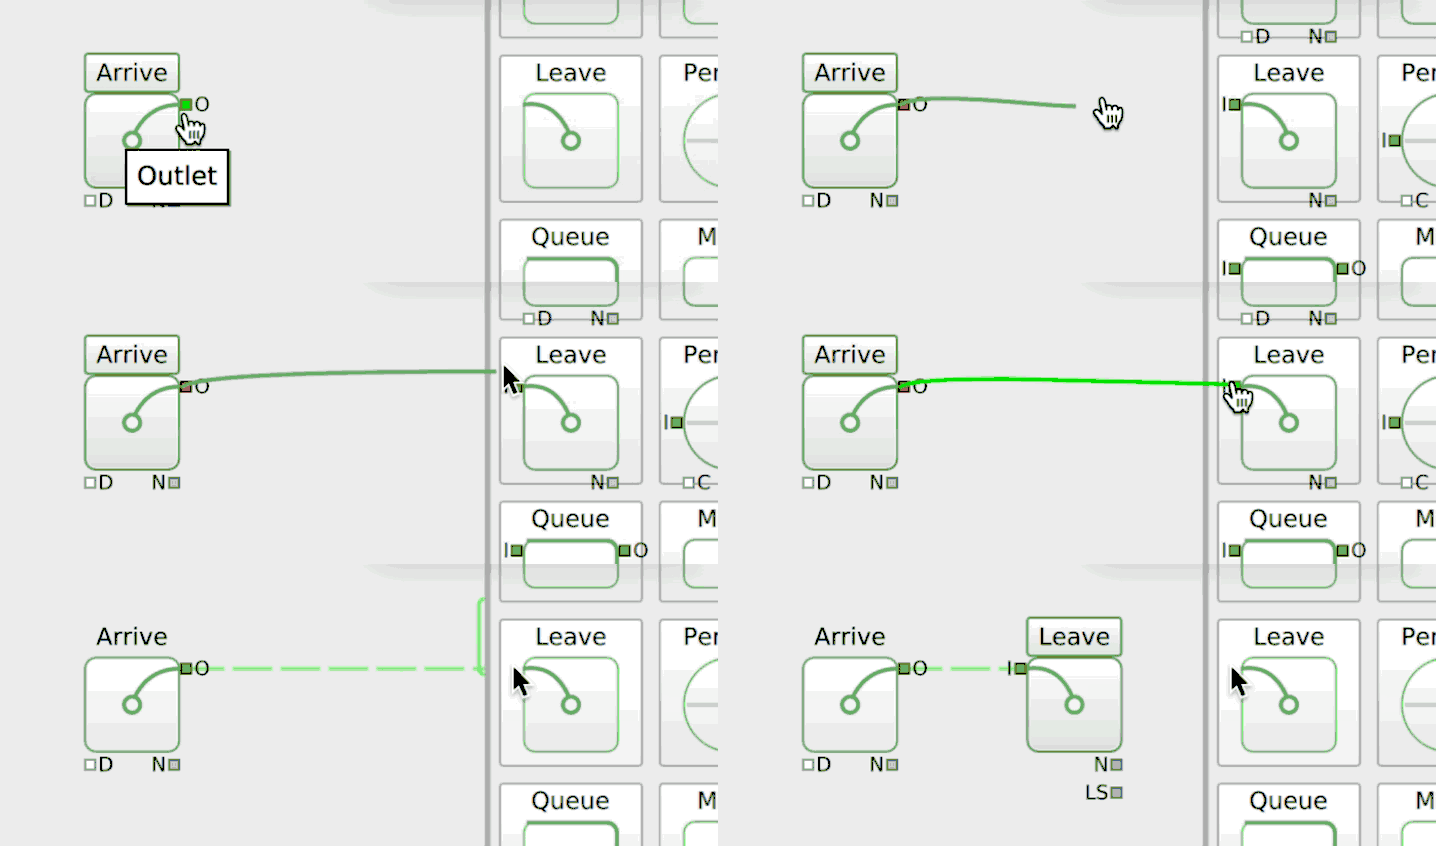
The quickest way to extend a model is to drag a connection straight into the Blocks tab:
- Press on a socket of a block on the canvas and drag.
- Move into the Blocks tab. While you drag, the block previews show their sockets too. To reach another category, hover its sub-tab name (for example Random) and the tab switches.
- Release over the matching socket of a preview, for example the inlet of Leave or the duration parameter of Perform.
Quisim adds the new block to the model and connects it with a pipe or wire in one step, so you never have to place a block first and wire it afterwards.
Selecting
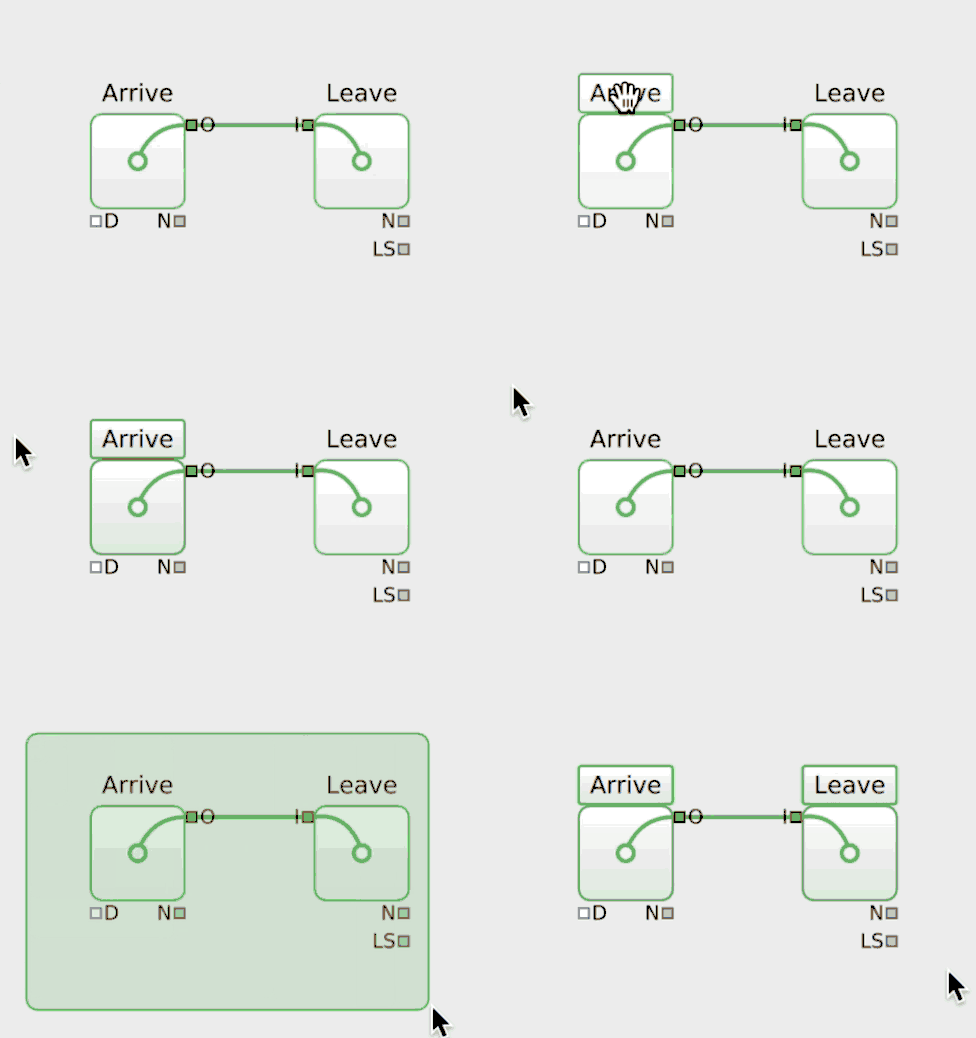
- Click a block's name label to select it. The label is the small button above an entity block, at the bottom edge of a value block, and below a report block. Its code is selected in the editor and its settings appear in the Properties tab.
- Click a pipe or wire to select it.
- Click empty canvas to clear the selection.
- Ctrl+click a block to add it to the selection or remove it.
- Shift+drag on empty canvas draws a selection rectangle that adds the enclosed blocks; Ctrl+drag toggles them. A plain drag on empty canvas also draws a rectangle in recent versions.
Selected blocks are tinted green in the code editor.
Shift+click a block's label to jump straight to its label field in the Properties tab. Shift+click a value socket to jump to that socket's property.
Moving, resizing and layout
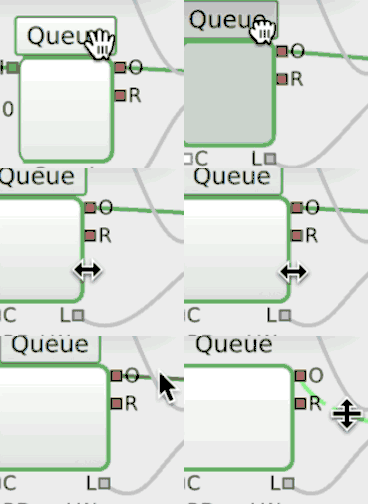
- Move a block by dragging its name label. If several blocks are selected, they move together.
- Resize a selected block by dragging its right edge, bottom edge or bottom-right corner.
- Bend a pipe or wire: click it to select it, then drag the curve.
Blocks without a position are placed automatically along the flow of the model. When you add a block or a connection, the layout is worked out again and these blocks move to make room. Below, a second Leave is connected to Arrive: it goes on top, and Perform and its Leave slide down.
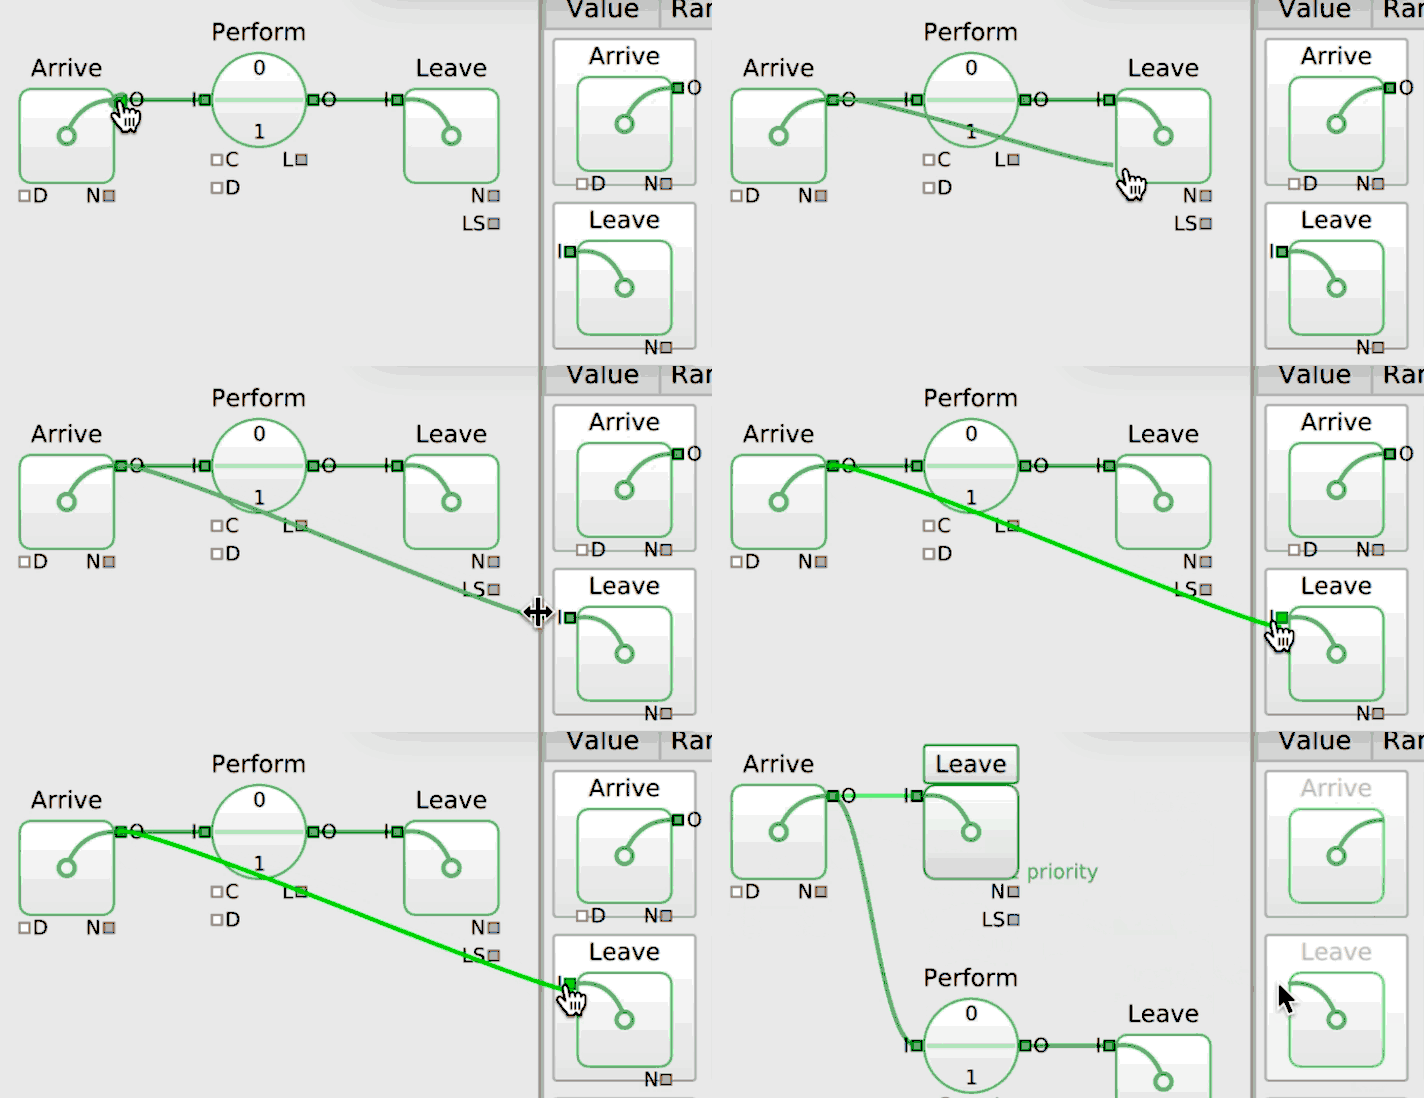
As soon as you move a block, its position is written into the code as x: and y:. The block is then anchored and stays where you put it, while the automatic layout keeps arranging the others. Changes are applied immediately.
You can also anchor a block without moving it: select it and click the anchor button between its x and y rows in the Properties tab. Click it again to remove the position and hand the block back to the automatic layout.


An anchored block still takes part in the automatic layout: the other blocks are arranged around it. To take a block out of the layout altogether, set offLayout to true (in the Properties tab or as offLayout: true in the code). The layout then ignores the block as if it were invisible, and the block stays at its x and y (or in the top-left corner if it has none). This suits blocks that sit beside the flow, such as a NumberInput, a Chart or the Steering block.
The Edit menu and the editor's menu (☰) have four layout commands:
| Command | Effect |
|---|---|
| Anchor all block positions | Fixes every block where it is now. |
| Align all fixed coordinates | Snaps fixed positions to an 8-pixel grid. |
| Loose all block positions | Removes all positions, so automatic layout takes over again. |
| Sort blocks in flow order | Reorders the code along the flow of the model. |
Deleting, undo and redo
Select one or more blocks and click Delete component with connections (trash icon in the editor toolbar or at the top of the Properties tab), or press Ctrl+Backspace. The blocks and all pipes and wires attached to them are removed. Delete component (in the menus) removes only the block declarations.
Every change, on the canvas, in the code or in the Properties tab, can be undone with Undo (Ctrl+Z) and redone with Redo (Ctrl+Shift+Z or Ctrl+Y, depending on the system).
Zooming and moving around
| To… | Do this |
|---|---|
| Zoom in or out | Toolbar magnifiers, Ctrl++ (or Ctrl+=) and Ctrl+- / ⌘+ (or ⌘=) and ⌘- |
| Zoom at the mouse pointer | Ctrl+mouse wheel / ⌘+scroll, or pinch on a touchpad |
| Back to 100 % | Ctrl+0 / ⌘0 (View › Original size) |
| Fit the whole model | Ctrl+9 / ⌘9 (View › Zoom to fit) |
| Scroll | Scroll bars, mouse wheel or two-finger scroll |
| Pan | Drag empty canvas with the middle mouse button (in older versions: plain drag) |
Editing in the code editor
The code editor shows the whole model as text, one line per block, pipe and wire, for example Queue { id: queue0; capacity: 5 }. The language is described in The Modeling Language in the handbook. The canvas and the code are two views of the same model.
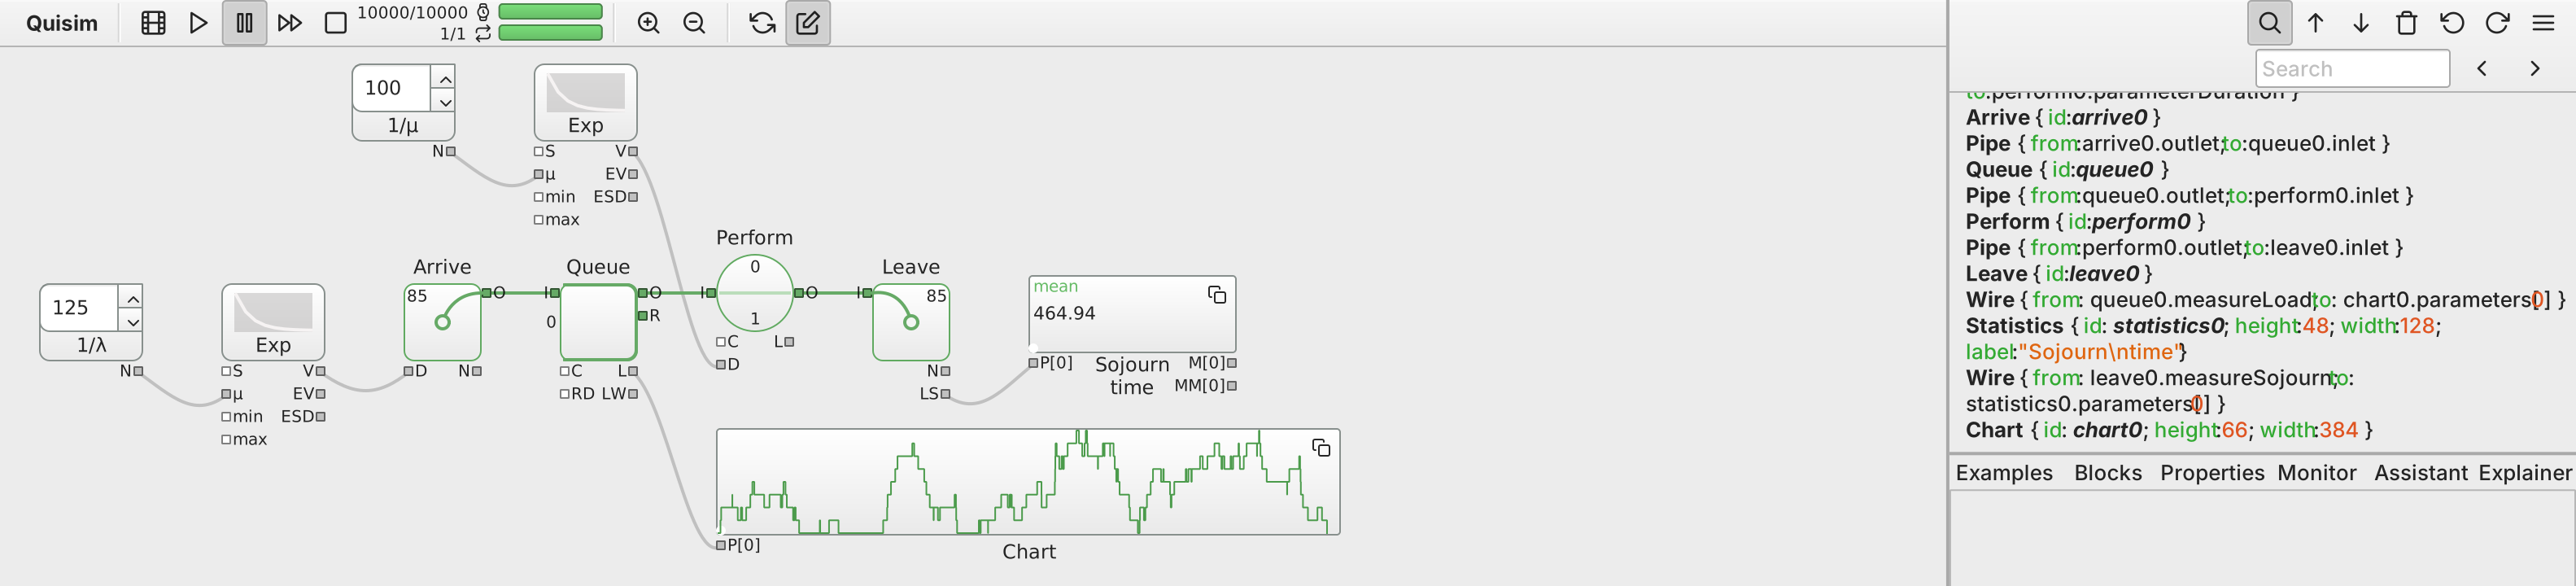
How code and canvas stay in sync
- Put the text cursor inside a declaration and that block, pipe or wire is selected on the canvas. Select a range of text to select everything it touches.
- Click something on the canvas and its declaration is selected in the code.
- Changes made on the canvas or in the Properties tab are written into the code and applied right away.
- Code you type is applied when you click outside the editor (for example on the canvas) or press Reload (Ctrl+D). Until then, the Properties tab shows a large Reload button instead of the properties.
The editor toolbar
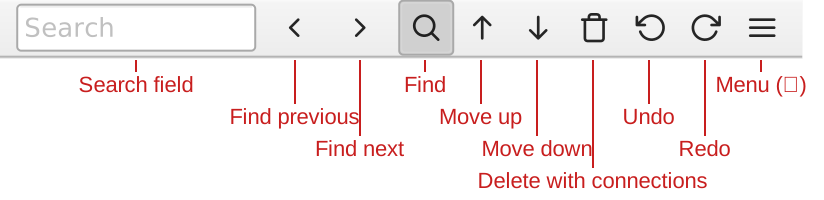
Above the code editor, from right to left: the menu (☰), Redo, Undo, Delete component with connections, Move down, Move up and Find.
- Move up / Move down (Ctrl+Up / Ctrl+Down) move the declaration under the cursor one item up or down. The order in the code matters, for example for the priority of pipes.
- Find (Ctrl+F) opens a search field on the left of the toolbar, with Find previous and Find next buttons. Enter finds the next match, Shift+Enter the previous one, Esc closes it.
- The ☰ menu holds Cut, Copy, Paste, Paste with unique names, the two Delete commands and the layout commands.
Copy and paste
With no text selected, Copy (Ctrl+C) copies the whole declaration of the item under the cursor, or of all selected blocks including the pipes and wires between them. Paste with unique names (Ctrl+Alt+V) renames the ids of the pasted copy so they do not clash with the originals. This is the easy way to duplicate part of a model. Paste with unique names is not available in the browser version.
The error list
When something is wrong, a list appears between the code editor and the tabs:
- Red entries are errors. A red error in the code means the model cannot be loaded; a red error during a run stops the run.
- Yellow entries are warnings. Many disappear by themselves once the cause is fixed.
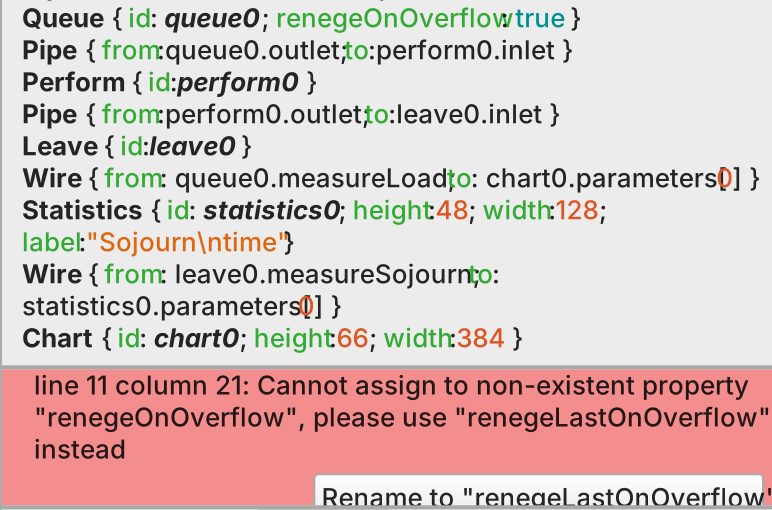
Click an entry to go to the problem: syntax errors move the text cursor to the line, other entries select the block. Hovering an entry highlights its block on the canvas, and a faulty pipe or wire is drawn in red. Some red errors offer a fix button, for example Rename to "…" when the code uses an attribute name from an older Quisim version. The list shows two entries at first; drag the divider to see more.

The Properties tab
The Properties tab shows the settings of the selected block, pipe or wire. If nothing or several items are selected, it says select a single item.
At the top you find a help button (click it to show the block's full description), the block type, its id, and the delete button. Below, one row per property: the block's attributes, its parameters, its measures (read-only live values), and display settings such as label, colours, x, y, width and height.
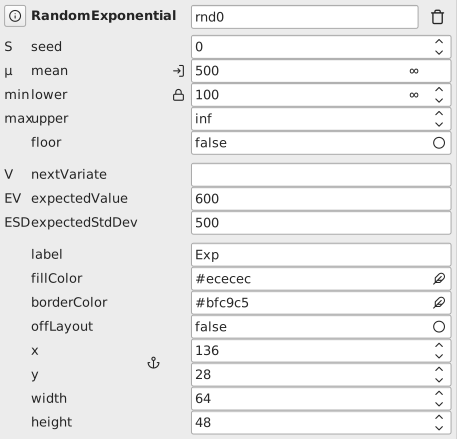
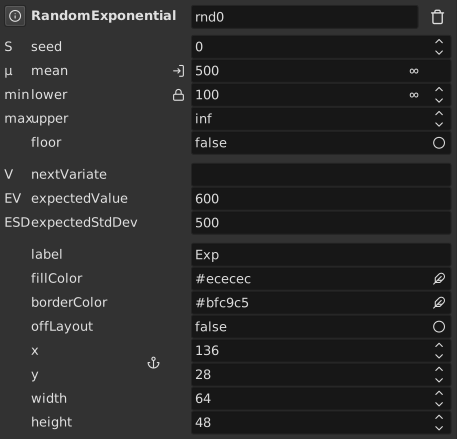
Parameters and measures show their socket letter on the left, for example μ for the mean of a RandomExponential and EV for its expectedValue.
Changing a value
- Click into the value field and type. Invalid input turns red and cannot be accepted.
- Press Enter, click the return-arrow button (Accept change) or click elsewhere to apply it. Press Esc to undo the edit.
- For numbers you can also use the small up/down buttons or the Up/Down arrow keys. Hold the key to speed up.
Fixed values (with a lock icon). Changing a value in the Properties tab fixes it: it is written into the code too, for example duration: 500, and a lock icon appears in front of the field. Click the lock to unfix the value: it is removed from the code, and the value goes back to the default, or to the value of an incoming wire if one is connected.
Some fields have extra buttons:
- ∞ sets the value to infinity (for example an unlimited capacity).
- A colour button opens a colour picker; the block changes colour while you pick.
- A text button opens a larger box for multi-line text such as the code of a Function block.
- An arrow-into-box icon (tooltip Attribute value set by Wire) means the value comes in through a wire, so you cannot type it here.
- Between the x and y rows, the anchor button fixes the block's position or hands it back to automatic layout.
Running a simulation
Run controls
| Control | Shortcut | What it does |
|---|---|---|
| Start clean | Ctrl+Enter / ⌘⏎ | Applies pending edits and starts a new run from time 0. |
| Pause | Ctrl+P / ⌘P | Pauses; press again to continue. |
| Step | Ctrl+Shift+P / ⌘⇧P | Runs exactly one event and stays paused. If nothing is running, it starts a new run paused at time 0; press Step again to run the first event. |
| Stop | — | Resets the run. |
| Animate | Ctrl+U / ⌘U | Animated playback on or off. |
The same commands are in the Simulation menu.
Start clean uses Ctrl+Enter, the usual "run" key in tools such as RStudio and Jupyter, and not Ctrl+R, because Ctrl+R would reload the page in a browser. If Pause is on when you press Start clean, the new run waits at time 0 until you release Pause.
You can watch Step one event at a time in the Monitor tab, see The Monitor tab.
Changing inputs during a run
Value blocks such as NumberInput show a small input field right on the canvas. The M/M/1 example has two of them, labelled 1/λ (mean time between arrivals) and 1/µ (mean service time).
- Click into the field and type a number, or use its up/down buttons or the Up/Down arrow keys.
- The running model picks up the new value at once.
- [Optional: Press Enter to keep the value as the block's new starting value (initValue), so the next run starts with it too.]
This works in the demo version as well.
Animated or fast
With Animate on, the run plays back so you can follow it: entities appear as small numbered bubbles, travel along pipes, wait in a zig-zag row in a Queue and slide through a Perform block. Numbers and fill bars inside the blocks update live. This is ideal for checking that the model does what you intend.
With Animate off, Quisim runs as fast as it can and updates the screen a few times per second. Most numbers inside the blocks are hidden while it runs and reappear when the run pauses or ends. Use this for long runs and many replications.
How fast the animation plays is set by the speed (V) of a Steering block, not in the toolbar. A larger speed plays faster.
Steering: duration, replications, editions
Add a Steering block (Blocks tab, Value) to set how the model is run. Models without a Steering block use the defaults below.
| Socket | Setting | Default |
|---|---|---|
| D | duration of one run (Infinity runs until no events are left) | 10000 |
| R | replications: independent repetitions with different random numbers | 1 |
| E | editions: outer loop, usually driven by an Explorer block that changes parameters | 1 |
| S | random seed; fix it to make runs reproducible | time-based |
| V | animation speed: model time units per millisecond of wall-clock time; larger values play faster | 1 |
The block shows the current time and replication on the canvas. Its outputs (T time, F finished, EN edition, RN replication) can be wired to other blocks. Details are in the API reference.
The progress display
Next to the run buttons, a small display shows two progress bars:
- the top row (watch icon): time/duration, for example
2345/10000, - the bottom row (repeat icon): replication/replications, or replication:edition/replications:editions when there are several editions.
Replication and edition numbers start at 0. Hover the display to see this explained.
Observing results
Reading values on the canvas
Hover any parameter or measure socket to see its current value. This works while the run is animated, paused or finished, as long as the editor pane is shown. Shift+click a socket to open that property in the Properties tab.
Report blocks
The report blocks (Blocks tab, Report) collect and display results. What each one computes is explained in Report Blocks in the handbook and in the API reference. In the interface they share a few habits:
- Hover a Chart, Histogram or EnsemblePlot to read exact values at the mouse position. Hover a table header in Statistics or Report to see what the column means.
- With several replications, a Chart shows each run in its own slot (alternately shaded), unless you overlay them.
- Table columns can be resized by dragging the header borders.
- The copy button (top right of each report block) opens a menu:
- Copy … as CSV / TSV copies the data, tab-separated with a header row, ready to paste into a spreadsheet, R or Python.
- Plot in Rprimo / Plot in primopy opens your browser on rprimo.com or primopy.com with the data and an editable plotting script. If the data is too big for this, a yellow warning in the error list tells you to use the Copy item instead.
The Monitor tab
The Monitor tab looks inside the running model. It works while Animate is on or the run is paused.
Entities. Select a single Queue, Perform or Pack block. The tab lists the entities it currently holds, with their number, colour and attributes, including where each entity has been (transfers). When a block holds several lists (a Perform has blocked, halted and active), each list has a button to expand it.
While the Monitor tab is open and Animate is on, all pipes are drawn dashed, and the dashes move one step each time an entity passes. This makes the flow easy to see.
Events. This sub-tab shows the event list: all future events in time order, each with its time and the block that owns it. The Step button in the top right corner runs the next event, so you can watch the list change one event at a time. This is the Event List exercise in the handbook's Quisim Internals section.
Saving a picture of the model
On the desktop app, the File menu offers Save PNG screenshot to file…, Save SVG screenshot to file… and Save PDF screenshot to file…. Each saves the whole canvas in its current state, including the charts and tables of report blocks, which is handy for a report. The images always use the light colour theme. These items are not available in the browser version.
Files: saving, opening, sharing
Quisim models are plain text files with the extension .qui. To share a model, send the .qui file.
Desktop app
| Action | Shortcut | Notes |
|---|---|---|
| New | Ctrl+N / ⌘N | Starts an empty model. Undo still works. |
| New window | Ctrl+Shift+N / ⌘⇧N | Opens a second, independent Quisim window. |
| Open… | Ctrl+O / ⌘O | Shows .qui files, starting in the last folder you used. |
| Save | Ctrl+S / ⌘S | Saves to the current file; only active once the model has a file name. |
| Save as… | — | Saves under a new name and adds .qui. Use the File menu. |
| Quit | ⌘Q (macOS), Ctrl+Q (Linux) | Closes Quisim. |
You can also drag a .qui file onto the canvas: the area turns green and the model opens when you drop it. On macOS you can drop a file onto the Quisim icon or use Open With in the Finder. The file name appears in the window title.
Browser version
In the browser the main toolbar has its own New, Open and Download as… buttons:
- Open shows the browser's file picker.
- Download as… asks for a file name and downloads the model as a
.quifile. Use it to save your work.
While you edit, the browser keeps a copy of your unsaved model. If you come back with unsaved work, for example after closing the tab, Quisim asks Unsaved session found. Restore? and lists the saved sessions with date and time. Click Restore on one to load it, click the trash icon to delete it, or click Ignore.
Still, download your model regularly. The browser copy lives only in that browser.
Unsaved changes
Before New, Open, dropping a file onto the canvas, quitting or signing out would throw away an edited model, Quisim asks whether you want to Discard the changes or Cancel. Opening a file from the macOS Finder (dropping it on the Quisim icon or using Open With) does not ask, so save first.
Learning aids
Examples
The Examples tab holds ready-made models, from Arrive→Leave to Sensitivity. Use them to see how a block is meant to be used, then change them and save your own copy. See Getting started above.
Explainer (AI tutor)
The Explainer tab is an AI tutor that reads your current model and answers questions about it. It only explains; it never changes your model. The tab appears a moment after the other tabs, once it has loaded.
- Type a question into the box Ask the explainer… at the bottom, for example Why does the queue grow?
- Press Enter or click the speech-bubble button (Ask). Shift+Enter starts a new line.
- The answer appears below your question. To stop it early, click the stop square or press Enter.
With each question, Quisim sends the model, the blocks you have selected, current error messages and the results of the last finished run. So run the model to the end before asking about results.
Suggested questions. The buttons above the conversation offer ready-made questions that fit what you are doing: Please explain this block. when a block is selected, What is this error about? when there are errors, What do you see? after a run, and always What is this model about? and What could we do?. Clicking one starts a fresh conversation.
Asking about a selection. Select blocks or connections on the canvas and small chips with their names appear above the question box. Your question is then about those items.
Managing the conversation.
- The pencil next to one of your questions puts it back into the box to reword it; the circular arrow asks it again with the model as it is now.
- New conversation (plus icon) clears the conversation. Start fresh often: long conversations get slower.
- After clearing, an undo arrow brings the erased messages back until you ask the next question.
- Opening another model or an example starts a new conversation automatically.
- On the desktop app the conversation is kept when you close Quisim. In the browser it is lost when you reload or close the page.
Options. send code (on by default) includes the whole model with each question. thinking (off by default) lets the AI reason before it answers: slower, but better on hard questions. Click the grey Thought for … line above such an answer to see its reasoning.
Status bar. At the bottom right of the Explainer:
- a coloured dot shows the AI server state: green connected, amber not connected or disconnecting, red unreachable. Hover it for details.
- a status text tells you what is happening. The first answer after a pause can take some time while the AI is connecting; a progress bar counts down meanwhile.
- a counter estimates the length of the answer. If it reaches the limit, the status says token limit reached and a continue button lets the answer go on.
The Explainer needs an internet connection and the full version.
Keyboard shortcuts
| Action | Windows / Linux | macOS |
|---|---|---|
| Files | ||
| New | Ctrl+N | ⌘N |
| New window (desktop) | Ctrl+Shift+N | ⌘⇧N |
| Open | Ctrl+O | ⌘O |
| Save | Ctrl+S | ⌘S |
| Quit | Ctrl+Q (Linux; none on Windows) | ⌘Q |
| Simulation | ||
| Start clean | Ctrl+Enter | ⌘⏎ |
| Pause / resume | Ctrl+P | ⌘P |
| Step | Ctrl+Shift+P | ⌘⇧P |
| Animate on/off | Ctrl+U | ⌘U |
| Reload (apply code) | Ctrl+D | ⌘D |
| View | ||
| Show/hide editor | Ctrl+E | ⌘E |
| Zoom in | Ctrl++ or Ctrl+= | ⌘+ or ⌘= |
| Zoom out | Ctrl+- | ⌘- |
| Original size | Ctrl+0 | ⌘0 |
| Zoom to fit | Ctrl+9 | ⌘9 |
| Zoom at pointer | Ctrl+mouse wheel, pinch | ⌘+scroll, pinch |
| Editing | ||
| Undo | Ctrl+Z | ⌘Z |
| Redo | Ctrl+Shift+Z or Ctrl+Y | ⌘⇧Z |
| Cut / Copy / Paste | Ctrl+X / Ctrl+C / Ctrl+V | ⌘X / ⌘C / ⌘V |
| Paste with unique names (desktop) | Ctrl+Alt+V | ⌘⌥V |
| Delete with connections | Ctrl+Backspace | ⌘⌫ |
| Move declaration up / down | Ctrl+Up / Ctrl+Down | ⌘↑ / ⌘↓ |
| Find | Ctrl+F | ⌘F |
| Find next / previous | F3 / Shift+F3 | ⌘G / ⌘⇧G |
| In the search field | Enter next, Shift+Enter previous, Esc close | ⏎ next, ⇧⏎ previous, Esc close |
| Canvas (mouse) | ||
| Add to / remove from selection | Ctrl+click | ⌘+click |
| Selection rectangle, add / toggle | Shift+drag / Ctrl+drag | ⇧+drag / ⌘+drag |
| Pan | Middle-button drag | Middle-button drag |
| Jump to property | Shift+click label or socket | ⇧+click label or socket |
Desktop and browser
Quisim runs as a desktop app and in the web browser. Almost everything works the same. The differences:
| Desktop app | Browser | |
|---|---|---|
| Sign in | Sign in to Quisim dialog, via your browser | On the web page before Quisim loads |
| Open / save | File menu (macOS/Linux) and shortcuts | New, Open, Download as… buttons in the toolbar |
| Unsaved work | Asks before discarding | Also kept in the browser and offered for restore |
| New window | Opens a second Quisim | Not available |
| Save PNG/SVG/PDF screenshot | Yes | No |
| Paste from the menu | Yes | Use Ctrl+V; the menu items are disabled |
| Paste with unique names | Yes | Not available |
| Explainer conversation | Kept between sessions | Lost when the page is reloaded |
| Session expiry | Renewed silently | Banner Your session has expired… |
Session expired (browser). If your browser session runs out (after about 8 hours), a banner with a red border appears at the top: "Your session has expired. Your work is safe — sign in again to keep using Quisim." Click Sign in again. Your model stays open the whole time.
Signing out. Open the About dialog (click Quisim in the toolbar) and click Sign out. On the desktop this closes Quisim, and you sign in again at the next start. In the browser you return to the sign-in page.
Troubleshooting and FAQ
My model does not start. Models never start by themselves. Press Start clean (Ctrl+Enter). If Pause is pressed in, release it (Ctrl+P). If the Simulation menu is grey, no model is loaded yet.
I typed in the code but nothing changed. Typed code is applied when you click outside the editor or press Reload (Ctrl+D). Check the error list for a red syntax error.
I cannot move or connect blocks, and hovering sockets shows nothing. The editor pane is hidden. Show it with Display editor (Ctrl+E).
Nothing moves on the canvas, and the numbers in the blocks are gone. Animate is off, so the model runs at full speed. Turn on Animate (Ctrl+U) or pause the run to see the numbers.
The animation is too slow or too fast. Change the speed (V) of the Steering block. A larger value is faster.
Every run gives different results. That is expected with random blocks when no seed is set. Set the seed (S) of the Steering block to make runs reproducible.
The Monitor tab says animate or pause…. Turn on Animate or pause the run, and for Entities select a single Queue, Perform or Pack block.
There is a green DEMO ribbon in the corner. You are using the demo version. Hover the ribbon to see what is limited: the code editor is read-only, only some blocks can be added, opening, saving and dropping files are disabled, and properties cannot be edited, except value fields such as those of a NumberInput block. Built-in examples can be run and explored but not changed. The AI features, such as the Explainer, are not available in the demo. Clicking the ribbon opens quisim.com.
Quisim shows "resource loading error". The interface could not be downloaded. Check your internet connection and start Quisim again.
The Explainer takes a long time to answer. After a pause the AI first needs to connect, which can take 20 seconds or more; the progress bar shows how long. If the status says In queue, others are asking at the same time.
A note says this version is outdated. Download the current version from quisim.com.